1 Intro

|
SyncScribe is a Windows based tool for transcribers and translators. Shortcut keys greatly increase productivity when transcribing a video or audio file. For example, while viewing a video file, the user can simply press the F9 key to automatically paste the current playing position into a selected document. |
2 Quick Start
If you have already installed SyncScribe, here is a crash course to start quickly with the Windows Media Player Plugin.
Otherwise, you may want to start from section 3 (Install).
- Open a new document and give it a name.
- Open SyncScribe.
Using the “Document” drop down menu in SyncScribe, select your document from step1.
Click on the “Open” button which is immediately right of the red text displaying “WMP Offline.”

Click on the top left “Open” button of the new Windows Media Player “plugin” window which just opened. This will open a file selection interface.
- Select the media file you want and click “Open.” Now the media file should be open in the Windows Media Player “plugin” window.
- If the media file has an imbedded time code, then enter it into “Time Code Synchronization” in “hh:mm:ss” format.
Clicking the Save button will have SyncScribe automatically calculate the seconds differential between the current media play time and the imbedded time code.
(For details, see section 13 Time Code Sync) - Start transcribing! The most convenient shortcut keys are:
- F1, F2, F3, and F4 for pasting in the person’s name.
- F9, F10 for pasting in the media’s current run time.
- Ctrl+Space for Pausing the media.
- Ctrl+Right and Ctrl+Left for skipping forward and back in the media.
3 Install
- Confirm you have appropriate installation (administrator) privileges on your computer.
- Obtain a copy of the SyncScribe installer. Save the installer file to a known location on your computer.
- Run the SyncScribe installer and follow the on-screen instructions.
4 First Run
-
When running SyncScribe without a license or an expired license, you will be prompted with a licensing screen similar to the figure below.
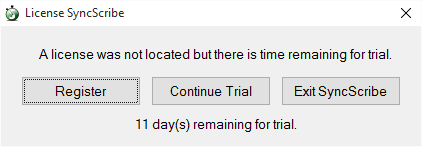
- Follow the instructions to either register a license or continue with the trial.
- Once licensed, subsequent launchings of SyncScribe will skip the prompt and load direclty to the the main screen.
5 Main Screen
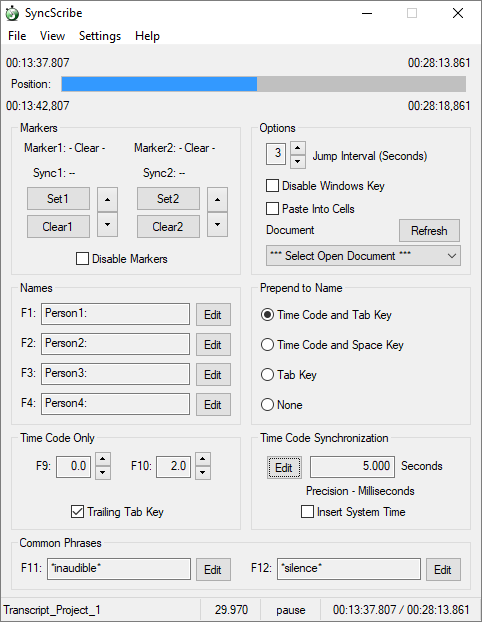
The main interface displays a menu bar and various areas with both display and interactive elements.
6 Menu
| Menu Summary | |||
| Menu | Sub-Menu | Sub-Sub Menu | Description |
| File | Reset Settings | - | This option resets all program settings to the defaults. |
| Exit | - | Closes program. | |
| View | Font Size | Compact | Sets program interface font size to compact. |
| Large | Sets program interface font size to large. | ||
| Language | English | Sets program interface language to English. | |
| Japanese | Sets program interface language to Japanese. | ||
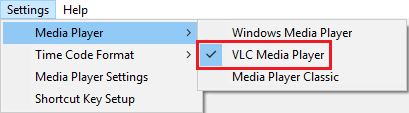
| Settings | Media Player | Windows Media Player | Link with Windows Media Player Plugin. |
| VLC Media Player | Link with VLC Media Player. | ||
| Media Player Classic | Link with Media Player Classic. | ||
| Time Code Format | - | Sets various format options for inserting time code. | |
| Media Player Settings | - | For editing media player specific settings. | |
| Shortcut Key Setup | - | For enabling and disabling shortcut keys. | |
| Help | Help Contents | - | Display summary of shortcut keys. |
| About SyncScribe | - | Display version and license data. | |
Menu Details:

File-Reset Settings will reset all SyncScribe program settings back to their defaults.
Settings include all available options and checkboxes including items under Media Player Settings.
SyncScribe remembers any changes you make to the options and checkboxes even after you close the program.
This option closes SyncScribe.


The available options for interface language are English and Japanese.
The interface language will match the detected system language at first runtime. The program defaults to English if the system language is not supported.
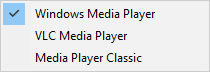
- Windows Media Player – The media player which comes included with Microsoft Windows. A Windows Media Player plugin window is used by SyncScribe when this option is used.
- VLC Media Player (VLC) – A free media player available for download.
- Media Player Classic (MPC) – Another free media player available for download.
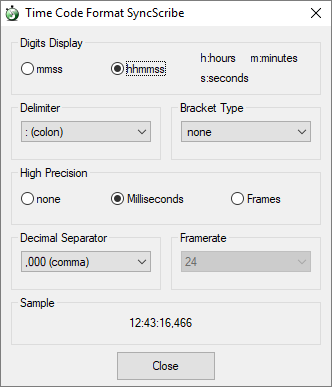
- Digits Display will select either mmss or hhmmss, the time code composed of digits.
- Delimiter selects the character used to delimit the time code.
- Bracket Type selects if you wish to surround your timecode with brackets, paranthesis, etc..
- High Precision allows for the option to add milliseconds or frame numbers in the formatted timecode.
- Decimal Separator selects which character to use for the separator (numerals right of the seconds value). Comma, Point, etc... (This option only applies when "High Precision" is set to "Milliseconds" or "Frames" option)
- Framerate selects the framerate of the burnt-in timecode you are transcribing. SyncScribe will approriately convert the current playtime to the estimated framenumber. (This option only applies when "High Precision" is set to "Frames" option)
- Sample shows you an example of the time code that will be inserted with current options selected.
- To revert to a default value, simply click the [Default] button for the corresponding field.
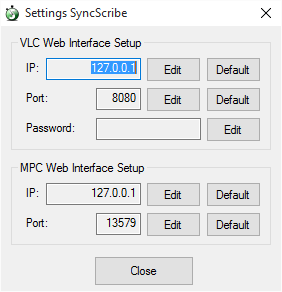
- If using VLC Media Player, set a password in the VLC web interface. For more details, see Section 16 "VLC Media Player".
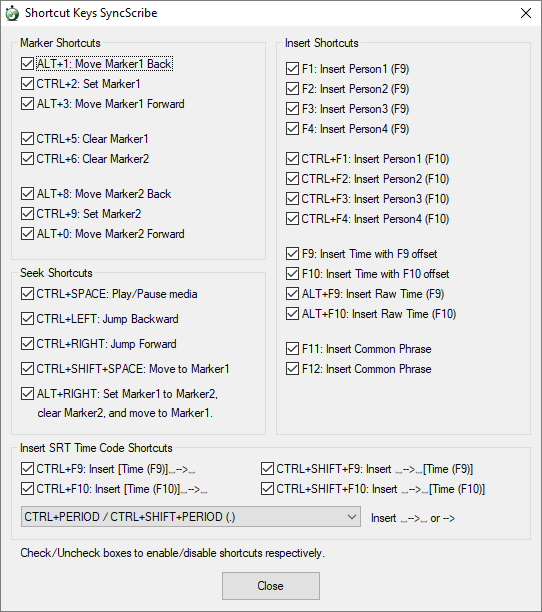
- This window allows optional disabling of any of the shortcut keys available by SyncScribe.
-
The insertion of " --> " (for SRT format subtitles) may be bound to a choice of 3 shortcut options
- CTRL + PERIOD
- CTRL + HYPHEN
- CTRL + GREATER THAN
7 Progress Display

- When the selected media player does not have a window open, the player’s name and the word Offline are displayed in red along with a button. Clicking the button will have SyncScribe attempt to open or detect the media player’s window.
- Left-clicking anywhere within the progress bar will cause the current playing position of the loaded media to be updated corresponding to the location clicked.
- The time displayed on the upper left is the current playing position of the loaded media. This should match the corresponding value displayed in the open media player’s window.
- The time displayed on the lower left is the current playing position with the synchronization value (see section 13) accounted for. It will be formatted to the currently selected time format.
- The time displayed on the upper right is the total run time of the loaded media. This should match the corresponding value displayed in the open media player’s window.
- The time displayed on the lower right is the total run time of the currently loaded media with the synchronization value (see section 13) accounted for. It will be formatted to the currently selected time format.
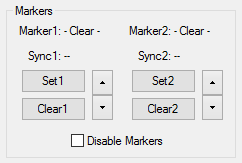
8 Markers
- The Markers Area displays information pertaining to the 2 markers. To loop a media segment repeatedly, set Marker1 to the beginning of the desired loop area, and Marker2 to the end.
- As long as the Markers are enabled, the loaded media will loop continuously between the 2 markers.
- The "Disable Markers" check box can temporarily disable the markers. Disabling markers will not erase the positions and thus restore when they are enabled again.
- The minimum loop duration is 2 seconds.
9 Names
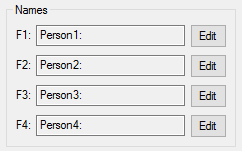
- The Names Area displays and allows interaction to set text representing names of the people with dialogue in the media files. This allows SyncScribe the assign text to paste when there is a press of the corresponding function key F1, F2, F3, or F4.
- Editing the text values can be achieved by either, clicking the corresponding EDIT button or hitting ENTER when the cursor is in the edit box. Always remember to click SAVE or hit ENTER to finalize editing the edit box. The SAVE button will return to EDIT when finalized.
- Noteworthy! Type Ctrl+TAB to enter a tab key in the Names area. (Typing simply TAB will cause you to jump over to the next GUI element) Adding a TAB key right after the name is handy when using the "Paste Into Cells" option allowing jumping to the next cell.
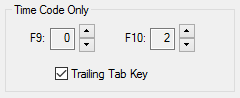
10 Time Code Only
- The Time Code Only Area defines offset values for when pasting time codes. The F9 and F10 keys will paste the current time code.
- For example: With an offset of 2 for the F10 key (like shown in the figure above), when the time code is at 2:10, then 2:08 (2 seconds subtracted) will be inserted when F10 is pressed.
- Offsets can be useful when the video/audio file is paused after listening to dialogue for a couple of seconds. Thus if the offset is 2, then the pasted value is 2 seconds prior to the current position, correctly representing the start time of the dialogue.
- The offset values can be adjusted between -10 and +10 seconds.
- Trailing Tab Key: This option is selected by default. This option will insert a tab key after the time code when F9 or F10 is pressed. This is useful when inserting into cells of a table/spreadsheet.
11 Common Phrases (Added in version 3.68)
- The Common Phrases Area binds the F11 and F12 shortcut keys to phrases of your choice. Common phrases during your transcription or translation can be set here to quickly paste into the text.
- The Common Phrases Area, similar to the Names Area, can be edited by either clicking the corresponding EDIT button or hitting ENTER when the cursor is in the edit box. Always remember to click SAVE or hit ENTER to finalize editing the edit box. The SAVE button will return to EDIT when finalized.
- Also similar to the Names Area, you can enter a TAB character by typing Ctrl+TAB during editing of the fields.

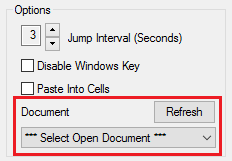
12 Options
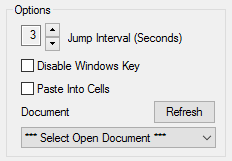
- Jump Interval: This is the number of seconds SyncScribe can jump either backward or forward with the Control + Left key and Control + Right key respectively. Possible values are 2 to 30 seconds.
- Disable Windows Key: This check box when selected will disable the Windows Key. This prevents accidental pressing of the Windows Key causing the display to change.
- Noteworthy! Paste Into Cells: This check box will allow you to paste into multiple cells (Document tables and Spreadsheet cells). Any tabs keys in the Names and Prepend-to-Name areas will cause text to be pasted into the next available cell. Thus tab keys are treated differently and so the text can be pasted in to separate cells of a table.
- Refresh: This button refreshes the Document drop down list.
-
Document Drop Down: The drop down list displays available documents. When a shortcut key to paste text is pressed, SyncScribe will first check if the selected document in this dropdown is active. If the window is not active, the window will be first activated to ensure the pasted text is entered into this window.
- Selecting “Normal Paste” will result in SyncScribe executing a simple paste operation without aforementioned window activation.
13 Prepend to Name
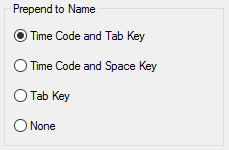
- Noteworthy!Time Code and Tab Key: This option prepends the Time Code and a Tab Key to the Name and pastes this when the shortcut is activated. This is handy when using "Paste Into Cells."
- Time Code and Space Key: This option prepends the Time Code and a Space Key to the Name and pastes this when the shortcut is activated. This is similar to option 1 except the Tab is a Space instead.
- Tab Key: This option simply prepends a Tab Key to the Name and pastes it when the shortcut is activated.
- None: This final option pastes just the Name assigned to the respective F1, F2, F3, and F4 shortcut when activated. This is the simplest option.
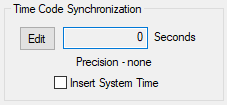
14 Time Code Sync
The value entered can be in a number of formats depending on the requirements of the final pasted timecode.
-
If no subsecond precision is needed: If the desired format for the inserted timecode does not require subsecond precision (no milliseconds or frames) follow these steps.
-
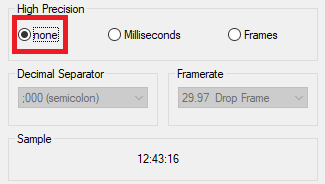
Select "none" for the "High Precision" option, located under Settings->Time Code Format. Then click "close" to close the Time Code Format window.
-
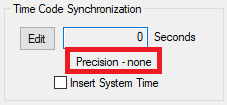
The "Time Code Sychronization" section in the SyncScribe main window will show that Precision is set to "none"
-
Next Enter either the difference in seconds between embedded value and actual playing position (if you can do the math), OR simply the embedded value in hours, minutes, and seconds separated by colons.
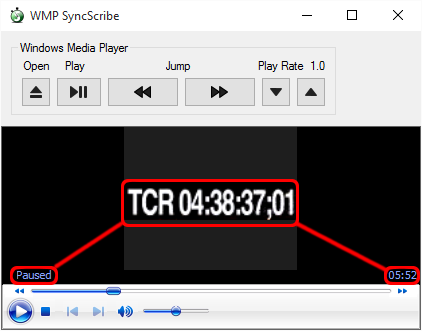
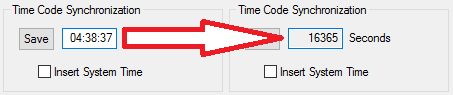
For example, here we have a video paused at 5:52, with an imbedded TCR showing "04:38:37" So we go ahead and type 04:38:37 into the field and click save.

-
SyncScribe will then automatically calculate the difference between 04:38:37 and 00:05:52 (which is 16,365 seconds) for you. This is reflected in the "Progress Display" area where the video position 5:52 is now synchronized to the embedded TCR value 4:38:37. Thus using shortcut keys will now result in "04:38:37" pasted instead of "05:52".
-
-
If the desired timecode format requires precision (milliseconds or frames):
-
In this example, the imbedded timecode is using a TCR format of hh:mm:ss;ff, h: hours, m: minutes, s: seconds, f: frame number.
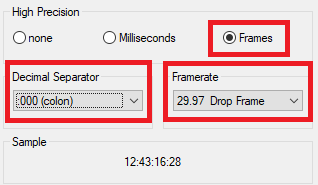
Select "Frames" for the "High Precision" option, located under Settings->Time Code Format.
-
-
Selecting Milliseconds in the "High Precision" section will enable choosing a Decimal Separator for the pasted timecode. The Decimal Separtor can be a Comma, Point, Colon, or Semicolon. Milliseconds will add 3 digits to the right of the decimal separator. A sample will be displayed in the "Sample" section.
-
Selecting Frames in the "High Precision" section will enable choosing a Decimal Separator and the Framerate for the pasted timecode. The Framerates available are: 24, 25, 29.97 (Drop Frame), 30, 48, 50, 59.94 (Drop Frame), and 60. Choose the framerate with which the imbedded (burnt-in) timecode is encoded.
A sample will be displayed in the "Sample" section.
-
-
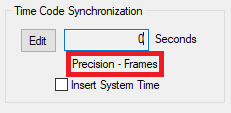
The "Time Code Sychronization" section in the SyncScribe main window will show that Precision is set to "Frames"
-
Then click "close" to close the Time Code Format window once the desired options are selected.
-
Next Enter either the difference in seconds between embedded value and actual playing position (if you can do the math), OR simply the embedded value in hours, minutes, seconds, and milliseconds/frames separated by colons.

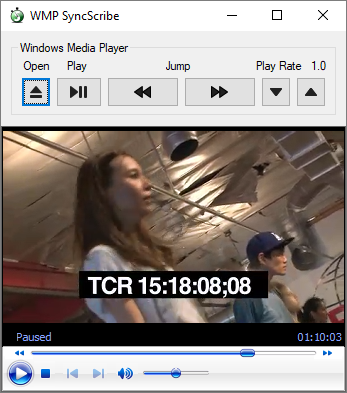
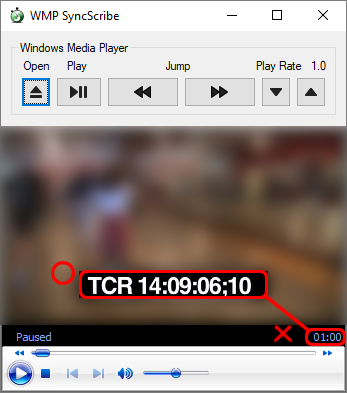
For example, here we have a video:
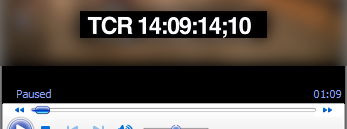
- with a burnt-in time code using 29.97 fps
- paused at 00:01:01.192 (the plugin shows "01:00" since its display is lagging).
- an imbedded TCR showing "14:09:06;10". Meaning 14 hours, 9 minutes, 6 seconds, and 10th Frame.

-
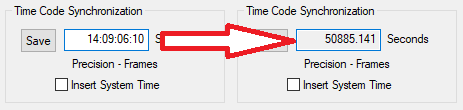
SyncScribe will then automatically calculate the difference between 14:09:06;10 and 00:01:01.192 (which is 50,885.141 seconds) for you. This is reflected in the "Progress Display" area where the video position 00:01:01.192 is now synchronized to the embedded TCR value 14:09:06;10.
-
Thus using shortcut keys such as F9 or F1 will now result in "14:09:06:10" pasted instead of "00:01:01.192".
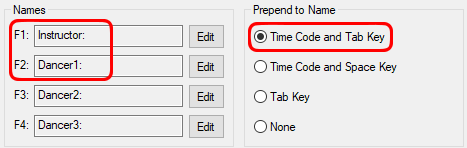
- Here we have the F1 key bound to "Instructor:" and F2 bound to "Dancer1:"
- Also, Prepend to Name option is set to "Time Code and Tab Key".
Thus hitting the F1 and F2 keys will result in automatically inserting the text:
- [Time Code] [Tab key] Instructor1:
- [Time Code] [Tab key] Dancer1:
respectively into a document (like below).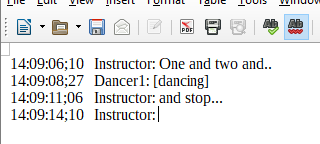
*NOTE 1: For the calculation above, frame 10 is estimated to be the 10th frame of 29.97 Frames/Second which equals to approximately 0.3336 seconds.
*NOTE 2: When a Drop Frame format (29.97 or 59.94 fps) is selected, there is an inherent drift (error) in the timecode which corrects itself every 10 minutes due to the drop frame format. This is properly taken into account and corrected for by SyncScribe.
*NOTE 3: SyncScribe estimates synchronization values based on user input and the real-time clock of the media player. However, due to the nature of the calculation, frame values may be off by a couple frames due to the the limitation of the precision and where a particular video is paused during the synchronization process.
*NOTE 4: Unfortunately, if a particular video has a burnt-in timecode which is incorrectly imbedded (e.g. encoded at the wrong framerate), Syncscribe's Timecode Synchronization will not be able to fix the synchronization issue. The real-time position of the video will continually drift and deviate from the burnt-in timecode. In this case, the source video will either need to be re-encoded correctly or the timecode will need to be manually entered.
-
Insert System Time: Enabling this choice will paste the computer’s system time instead of the time code.
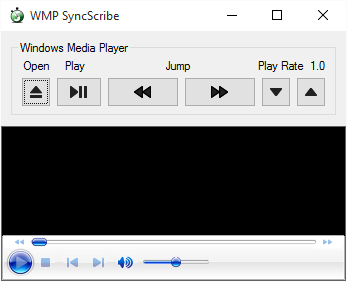
15 Using Windows Media Player
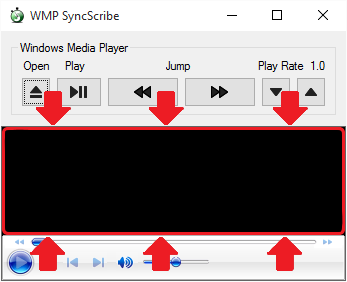
If Windows Media Player is selected in the menu [Settings->Media Player->Windows Media Player], the [Open] button displays.
-
Click on [Open] to open an additional window with an instance of the Windows Media Player Plugin.

- Use the various controls to load, play, and manipulate the media player.
- The "Open" button opens a dialog to select a media file.
- The "Play" button will toggle media playback between play and pause.
- The two "Jump" buttons will jump backward and forward in the media respectively.
- The play rate can be adjusted between 50% and 200% using the up and down buttons for files supported by Window Media Player. If the buttons have no effect, Windows Media Player does not support variable play rate for that file.
- A left mouseclick in the playback area shown above will play and pause similar to the "Play" button. (Similar to Youtube)
16 Using VLC Media Player
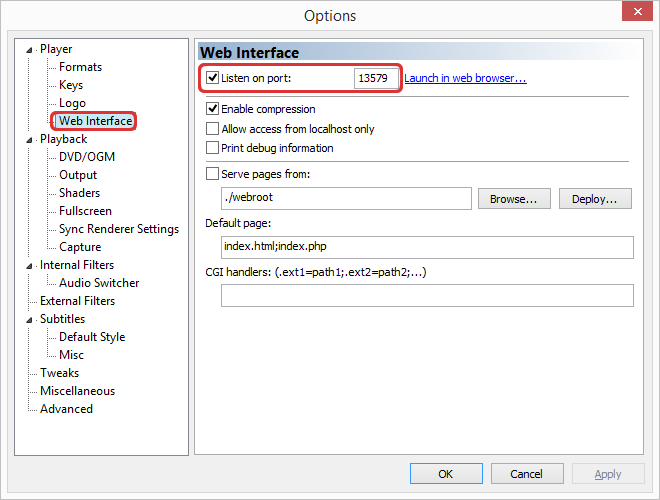
When using VLC Media Player, ensure the web interface is enabled and password is set.
(Note: VLC requires web interface passwords starting from Ver 2.1.0)
- To enable the web interface, select the VLC menu Tools->Preferences.
-
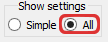
Select the radio button “All” under the Show Settings box in the lower left corner.
-
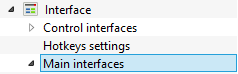
Then select Interface->Main interfaces in the left column.
-
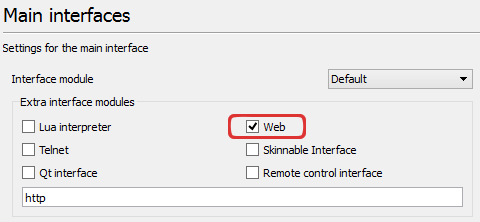
On the right column, in the Main interfaces area, select the Web checkbox.
-
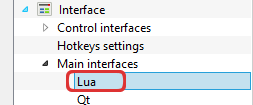
Then select Lua under Main interfaces.
-
Type in a desired password in the Lua HTTP Password text box.

-
Click Save in the lower right corner and restart VLC Media Player after changes are made.

-
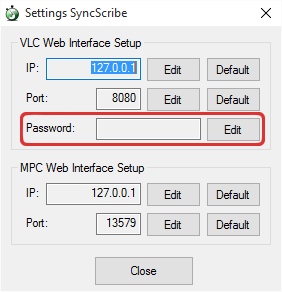
Start SyncScribe and select Settings->Media Player Settings. Edit the Password textbox with the same password you set in VLC Media player during the previous steps.
-
Choose VLC Media Player under Settings->Media Player. Afterwards, SyncScribe should have the ability to link with VLC Media Player.
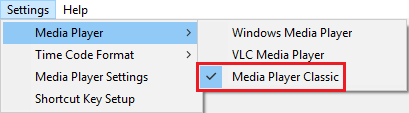
17 Using Media Player Classic
When using Media Player Classic, ensure the web interface is enabled.
- To enable the web interface, select the Media Player Classic menu View->Options.
-
Under Player->Web Interface, ensure that check box “Listen on port” is selected.
The recommended port value is the default, 13579.
- Click Apply and restart Media Player Classic when changes are made.
-
Choose Media Player Classic under Settings->Media Player. Afterwards, SyncScribe should have the ability to link with Media Player Classic.
18 Shortcut Keys (Hotkeys)
If you are unsure of how a shortcut key works, try it out and see what happens!All shortcut keys are global so they will work wherever your cursor is located.
These shortcut keys manipulate Marker1 and Marker2.
* You need to have a file loaded in the media player for these shortcut keys to work.
-
ALT+1 Move Marker1 backward by 1 second  +
+

-
CTRL+2 Set Marker1 to the current position of the loaded media file.  +
+

-
Alt+3 Move Marker1 forward by 1 second
+

-
CTRL+5 Clear Marker1
+

-
CTRL+6 Clear Marker2
+

-
ALT+8 Move Marker2 backward by 1 second
+

-
CTRL+9 Set Marker2 to the current position of the loaded media file.
+

-
ALT+0 Move Marker2 forward by 1 second.
+

These shortcut keys allow you to navigate the currently loaded media in the player window.
* You need to have a file loaded in the media player for these shortcut keys to work.
"SPACE" represents the spacebar.
"LEFT" represents the ← left arrow key
"RIGHT" represents the → right arrow key.
-
CTRL+SPACE Play/Pause the loaded media file.
+

-
CTRL+LEFT Jump Backward by the number of seconds set in “Jump Interval.” (default 3 seconds)
+

-
CTRL+RIGHT Jump Forward by the number of seconds set in “Jump Interval.” (default 3 seconds)
+

-
CTRL+SHIFT+SPACE Jump to Marker1 in the loaded media file.
+
 +
+
-
ALT+RIGHT This shortcut is similar to the concept of “moving the chains” after a
"1st Down" in American Football. 3 things occur in the following order.- Moves Marker1 to where Marker2 is located.
- Marker2 is then cleared.
- Jump to Marker1 in the loaded media file.
+
These shortcut keys allow you to paste text.
* You need to have an open document to be able to paste text for these shortcut keys to work.
Note:
- "Prepend" options refers to optional prepended text to add to the "Name". This option is chosen by the radio button in the "Prepend to Name" (section 12) area.
- "Raw" time refers to the actual current play time of the media. Thus WITHOUT the "Time Code Synchronization" value applied.
-
F1 Insert name "Person1" with "Prepend" options (F9 Time Code) 
-
F2 Insert Person2 with "Prepend" options (F9 Time Code) 
-
F3 Insert Person3 with "Prepend" options (F9 Time Code) 
-
F4 Insert Person4 with "Prepend" options (F9 Time Code) 
-
CTRL+F1 Insert Person1 with "Prepend" options (F10 Time Code)
+
-
CTRL+F2 Insert Person2 with "Prepend" options (F10 Time Code)
+
-
CTRL+F3 Insert Person3 with "Prepend" options (F10 Time Code)
+
-
CTRL+F4 Insert Person4 with "Prepend" options (F10 Time Code)
+
-
F9 Insert the current time with the offset value at “Time Code Only F9”. 
-
F10 Insert the current time with the offset value at “Time Code Only F10”. 
-
ALT+F9 Insert the “raw” time with the offset value at “Time Code Only F9”.
+
-
ALT+F10 Insert the “raw” time with the offset value at “Time Code Only F10”.
+
-
F11 Insert phrase pre-defined by user for the F11 key. 
-
F12 Insert phrase pre-defined by user for the F12 key. 
These shortcut keys allow pasting timecodes pre-formatted for SRT Subtitles. This increases productivity during SRT subtitle creation by including the --> (arrow) characters in the pasted text.
-
CTRL+F9 Insert "[F9 Timecode] --> " (Timecode with trailing -->)
+
-
CTRL+F10 Insert "[F10 Timecode] --> " (Timecode with trailing -->)
+
-
CTRL+SHIFT+F9 Insert " --> [F9 Timecode]" (--> with Timecode after)
+
+
-
CTRL+SHIFT+F10 Insert " --> [F10 Timecode]" (--> and Timecode after)
+
+
-
Insert " --> " (With Surrounding Spaces). 3 settings available (Choose 1)
CTRL + PERIOD (default)
+

CTRL + HYPHEN
+

CTRL + GREATER THAN
+

-
Insert "-->" (No Spaces). 3 choices available (Choose 1)
CTRL + SHIFT + PERIOD (default)
+
+
CTRL + SHIFT + HYPHEN
+
+
CTRL + SHIFT + GREATER THAN
+
+